Wednesday, August 4, 2010

HOW TO LOGIN TO XP AFTER YOU FORGOT YOUR PASSWORD

HOW TO LOGIN TO XP AFTER YOU FORGOT YOUR PASSWORD


1. Place your Windows XP CD in your cd-rom and start your computer (it’s assumed here that your XP CD is bootable – as it should be - and that you have your bios set to boot from CD)

2. Keep your eye on the screen messages for booting to your cd Typically, it will be “Press any key to boot from cd”

3. Once you get in, the first screen will indicate that Setup is inspecting your system and loading files.

4. When you get to the Welcome to Setup screen, press ENTER to Setup Windows now

5. The Licensing Agreement comes next - Press F8 to accept it.

6. The next screen is the Setup screen which gives you the option to do a Repair.

It should read something like “If one of the following Windows XP installations is damaged, Setup can try to repair it”

Use the up and down arrow keys to select your XP installation (if you only have one, it should already be selected) and press R to begin the Repair process.

7. Let the Repair run. Setup will now check your disks and then start copying files which can take several minutes.

8. Shortly after the Copying Files stage, you will be required to reboot. (this will happen automatically – you will see a progress bar stating “Your computer will reboot in 15 seconds”

9. During the reboot, do not make the mistake of “pressing any key” to boot from the CD again! Setup will resume automatically with the standard billboard screens and you will notice Installing Windows is highlighted.

10. Keep your eye on the lower left hand side of the screen and when you see the Installing Devices progress bar, press SHIFT + F10. This is the security hole! A command console will now open up giving you the potential for wide access to your system.

11. At the prompt, type NUSRMGR.CPL and press Enter. Voila! You have just gained graphical access to your User Accounts in the Control Panel.

12. Now simply pick the account you need to change and remove or change your password as you prefer. If you want to log on without having to enter your new password, you can type control userpasswords2 at the prompt and choose to log on without being asked for password. After you’ve made your changes close the windows, exit the command box and continue on with the Repair (have your Product key handy).

13. Once the Repair is done, you will be able to log on with your new password (or without a password if you chose not to use one or if you chose not to be asked for a password). Your programs and personalized settings should remain intact.
Tuesday, July 27, 2010

Alert: Fix Available To Correct Office 2003 RMS Document Issue

Alert: Fix Available To Correct Office 2003 RMS Document Issue

What is the purpose of this alert?

This alert is to make you aware of a solution (Hotfix) for an issue affecting Office 2003 customers using Rights Management Service (RMS) and Active Directory Rights Management Service (AD RMS) protected documents.

Symptom: Starting on December 11, 2009, customers using Office 2003 will not be able to open Office 2003 documents protected with the Rights Management Services (RMS) or Active Directory Rights Management Service (AD RMS). Customers will also not be able to save Office 2003 documents protected with RMS/AD RMS.

The following error message may be displayed when attempting to open RMS-protected/ AD RMS-protected documents using Office 2003:

"Unexpected error occurred. Please try again later or contact your system administrator"

Scope: This symptom affects Office 2003 products used in conjunction with RMS and AD RMS, including Word 2003, Excel 2003, PowerPoint 2003, Outlook 2003, Excel Viewer and Word Viewer. It does not affect Office 2007.

Solution: A supported hotfix is now available from Microsoft. Note: the hotfix is intended to correct only the problem described above. Apply the hotfix only to systems that are experiencing this specific problem. Please review the following KB Articles for more information on affected products, hotfix prerequisites, restart requirements, workarounds, hotfix supersedence, registry information and file information:

· KB798551: Description of the Office 2003 documents protected with AD RMS/RMS Hotfix package: December 11, 2009

· KB978557: Description of the Excel Viewer documents protected with AD RMS/RMS Hotfix package: December 11, 2009

· KB978558: Description of the Word Viewer documents protected with AD RMS/RMS Hotfix package: December 11, 2009

More Information: The Office product group will provide updated information as it becomes available at the Web sites below.

How to STOP How to stop svchost.exe using up 100% system resources (Windows XP Only)

How to STOP How to stop svchost.exe using up 100% system resources (Windows XP Only)

  • Visit the Microsoft website and Download Windows Update v3 WindowsUpdateAgent30-x86.exe and save it to your C:\ drive
  • Download this file fix_svchost.bat (right click and choose save as..) and save it to your C:\ drive
  • Download this file WindowsXP-KB927891.exe (right click and choose save as..) and save it to your C:\ drive
  • Reboot the computer and log in to Windows XP in safe mode. To do this, press F8 just before the WindowsXP logo shows up during boot and press up to choose “Safe Mode”
  • Once Windows has loaded and you have the option of which user account to use, log on as “Administrator”.
  • Click Start > Run, choose the Browse button and find the fix_svchost.bat file you saved before, press Open, then OK.
  • A black screen will pop up and white text will scroll past. Wait for this process to finish as it could take several minutes. It will close itself when its finished.
  • Once the black screen disappears, Click Start > Run, choose the Browse button and find the WindowsUpdateAgent30-x86.exe file you saved before, press Open, then OK. Follow the prompts as it installs.
  • When Windows Update Agent finishes installing, Click Start > Run, choose the Browse button and find the WindowsXP-KB927891.exe file you saved before, press Open, then OK. Follow the prompts as it installs.
  • Reboot the computer

Networking 7 with older Windows versions (XP Vista)

Networking 7 with older Windows versions (XP Vista)

· This process will make the network a little less secure but it works well because a password isn’t used and everyone is allowed access.

1. First, know what the Computer name is and what Workgroup it belongs to.

The Workgroup name needs to be the same on all PC’s that are being networked; no matter the OS on each system. This is already setup, even if only by default, in the setup process while installing each OS.

Verify what the Windows 7 computer and workgroup names are by going to Control Panel > System and Security > System > and read information under “Computer name, domain, and workgroup settings” (The third category down).

If the names need to be changed go to Change settings in that category or Advanced System Settings in left pane. Then, Computer Name Tab > Change, type the Computer Name and Workgroup Name. > OK. Make the computer name meaningful to aid recognition. The computer should restart.

2. Second, adjust Win7 settings to allow for sharing with older OS on other networked systems.

Now go to Control Panel > Network and Internet > Network and Sharing Center > Change Advanced Sharing Settings (side panel). Make sure Network Discovery, File and Printer Sharing, and Public Folder Sharing are all set to “on” and Password Protected Sharing is set to “off”.

Note: I recommend leaving Media sharing set to “on” and under Windows HomeGroup connections select “Allow Windows HomeGroup to manage homegroup connections (recommended)”.

3. Third, choose which folders to share on the network and adjust properties to do so.

Drag any folders to be shared to the Public folder.

Or…

To share a specific Windows 7 folder or additional drives on the system, right-click it > Properties > Sharing Tab > Advanced Sharing > tick box for Share this folder > Apply > OK > Close. You only need to share the highest level folder, not every sub-folder. Two little people should appear on the icons of the folders that are shared.

4. Now, you MUST follow this step or the folders will not be shared despite previous steps followed!!!

Because Password Protected Sharing turned off, the security permissions have to be changed on the folder(s) to allow Everyone access. Right-click the shared folder > Properties > Security Tab > Edit > Add and type “Everyone” (not the quotes) into the box and select OK. Tick the boxes next to the permissions you want to allow (e.g. Read or Write, etc.) then Apply > OK. Some messages may appear: “An error occurred while applying…” This is not unusual and can be ignored by clicking Continue.

5. Windows firewall is normally set to allow file and printer sharing but if you have a third-party firewall make sure file and printer sharing are enabled so that each machine can talk to the other(s). Do not disable the Windows firewall if it’s the only one running.

6. To see or copy files, click the Windows Orb (Start) > Network and the computers/folders/files should appear. Use two windows to drag files from one PC to another.

Reference: http://social.technet.microsoft.com/Forums/en-US/w7itpronetworking/thread/033c418b-1096-4df7-bfad-fd3d431f3cd5


HowTo: Bypass Megavideo Time Limit

HowTo: Bypass Megavideo Time Limit


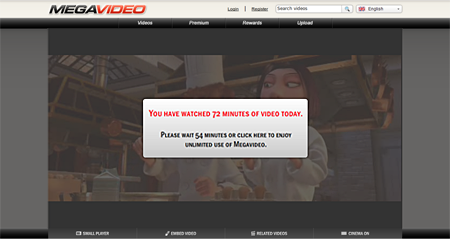
Are you annoyed and frustrated with Megavideo’s time limit? Don’t worry, I’ll show you how you can bypass that limit and let you enjoy watching your video or movie without any interruptions. Megavideo is one of the best and one of the most popular video sharing sites in the Internet. The problem about watching movies on Megavideo is that there is a 72-minute time limit and once you hit the limit, the video stops and you get this message:

Megavideo Time Limit

Some movies are more than 72 minutes long, some are even 2-3 hours long so once you hit the time limit, you can’t continue watching the movie anymore. Sucks doesn’t it? Today, I’m gonna share with you a few methods on how to bypass the Megavideo time limit.

DISCLAIMER: These are workarounds suggested by other users. I do not endorse them and I haven’t tried all of the methods listed below. PERFORM THE METHODS AT YOUR OWN RISK.

Method 1 – Work Offline
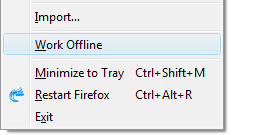
Firefox Work Offline
1. Open the video that you want to watch on Megavideo. Click the Play button and when it starts playing, click on the Pause button to let it buffer.
2. Wait until the video is done loading/buffering to 100%.
3. Click on Work Offline and watch the video.

Mozilla Firefox
- Click on File > Work Offline.

Internet Explorer 7 & 8
- Click on Tools > Work Offline.

[Remember to unclick the Work Offline button once you're done watching]

Method 2 – Block Cookies
1. Clear your web browser’s cache and delete cookies.
2. Block cookies.

Mozilla Firefox
- Click on Tools > Page Info.
- Click on the Permissions tab. Under Set Cookies, if Use Default is checked, uncheck it then select Block.

Internet Explorer 7 & 8
- Click on Tools > Internet Options.
- Click on the Privacy tab.
- Click on Sites.
- Under “Address of Website“, type “megavideo.com” (without the quotes), click Block.
- Repeat the previous step and this time type “www.megavideo.com“, click Block.

3. Disconnect your modem and wait for about 10 seconds before reconnecting it.
4. Continue watching the video.

Method 3 – Download
(You’ll need Mozilla Firefox for this one.)
Download Helper
1. Install the DownloadHelper addon and restart Firefox.
2. Go to Megavideo and open the video that you want to watch and click Play.
3. Once the video starts buffering, the DownloadHelper icon would start revolving. Click on thesmall arrow beside it then click on the .flv file and it will prompt you to save the file to your computer. You can rename the file if you want and choose where you want it to be saved.
4. Watch the video with VLC Media Player or Applian FLV player.

Method 4 – Illimitux addon
(You’ll need Mozilla Firefox for this one.)
1. Install the Illimitux addon and restart Firefox.
2. Go to Megavideo and open the video that you want to watch.
3. Click on the Illimitux icon (lower right corner of Firefox) and you will be directed to another page where you can watch the video without any time limits.

Caution: This add-on has not been reviewed by Mozilla. Be careful when installing third-party software that might harm your computer.

Method 5 – Megastreaming.org
1. Go to Megavideo and copy the URL of the video that you want to watch. (example: http://www.megavideo.com/?v=Q7UK1BVI)
2. Open http://megastreaming.org/.
3. Paste the URL of the video you want to watch on the space provided and click Play.

Method 6 – Lyke.co.cc
1. Go to Megavideo and copy the URL of the video that you want to watch. (example: http://www.megavideo.com/?v=Q7UK1BVI)
2. Open http://lyke.co.cc/.
3. Paste the URL of the video you want to watch on the space below “Remove Time Limit” and click Watch.

Method 7 – No More 72 Mins
1. Go to Megavideo and copy the URL of the video that you want to watch. (example: http://www.megavideo.com/?v=Q7UK1BVI)
2. Open http://megavideonotimelimit.com/.
3. Paste the URL of the video you want to watch on the space provided and click Watch The Video.

Just choose any of the methods listed above which you think suits you best, follow the instructions and you’ll be able to enjoy watching videos and movies on Megavideo without any time limits or restrictions.

If you know of any other way or alternatives on how to bypass the Megavideo time limit, please share it with us so we can include it on this list.

Monday, November 16, 2009

Remove OGA Office Not Genuine Notifications (Uninstall KB949810)

Remove OGA Office Not Genuine Notifications (Uninstall KB949810)


All Microsoft Office versions such as MS Office 2003, MS Office 2007, MS Office 2010 or MS Office XP are getting updated with Office Genuine Advantage Notifications (OGA KB949810) automatically. Once installed KB949810verifies your product key number and if it finds the product key number illegal or pirated, it will start showing a “This copy of Microsoft Office is not genuine” notification in your system tray area along with at splash screen whenever you try using Office programs.

OGA crack was a rumor and we are yet to see any KB949810 crack working. But we can manually uninstall this KB949810 update to get rid of these notifications. Do note that this update can’t be removed from ‘Add or Remove Programs’ interface as it does not show up there. But you can follow the below working tricks to disable and remove Office not genuine notifications from system tray and MS office programs interface.

Disable OGA Notification : Hack – 1

We can remove OGA notification by disabling OGAAddin.dll from loading when we start Office applications. OGAAddin.dll file shows the notification and removing this will stop such notifications from appearing. This below hack will make Windows think that KB949810 is properly installed and it will not prompt you for further installation.

  1. Go to Start >> Run >> Type regedit in the box and hit Enter
  2. This will open Registry Editor window, press Ctrl+F to open search box
  3. Type OGAAddin.connect in the serach box to find this registry key
  4. Once found, Right click on Load behaviour and select Modify option
  5. Edit and change the value from 3 to 0
  6. Repeat this process for each and every instances of OGAAddin.connectkey
  7. You are done.

Disable OGA Notification – Hack 2

This hack will completely remove OGAAddin.connect registry key from system registry and the OGA notifications will be automatically removed. However the system might ask you to install this update using Windows Live Update again.

  1. Go to Start >> Run >> Type regedit in the box and hit Enter
  2. Navigate to the following key paths and remove these registry keys completely from your system. You might find any other key which contains OGAAddin.connect registry value, remember to remove all of them.
  3. hkey_local_machine\software\microsoft\office\word\addins
    hkey_local_machine\software\microsoft\office\excel\addins
    hkey_local_machine\software\microsoft\office\powerpoint\addins
    hkey_local_machine\software\microsoft\office\outlook\addins

  4. Delete the OGAAddin.connect registry value from above paths
  5. You are done.

Disable OGA Notifications – Hack – 3

This hack will remove OGAAddin from within MS Office applications, but you need to sign into any user profile on your computer with administrative access.

  1. Navigate to C:\Program Files\Microsoft Office\Office12 (address might differ depending on your Office version and installation drive) >> Right click on any office applications such as inword.exe, excel.exe, powerpnt.exe etc and choose Run as Administrator option
  2. Head to Options (at the bottom of the menu) >> Add-Ins
  3. Select COM Add-ins under Manage drop down list >> Hit Go
  4. Remove OGA notifications

  5. Disable or remove OGAAddin
  6. Follow the above process to remove OGAAddin from each and every office application
  7. You are done.

Disable OGA Notifications – Hack – 4

We can completely disable OGA or KB949810 notifications by uninstalling KB949810 OGA Notification via OGANotifier.msi and this will stop and remove all OGA notifications.

  1. Navigate toC:\Windows\SoftwareDistribution\Download\8998da55d52b36c0e98ba016ddd50de0\ folder (Assuming C:\ as your installation folder)
  2. Extract OGANotifier.cab using WinRAR to find a file named asOGANotifier.msi
  3. Right click on OGANotifier.msi >> select Uninstall
  4. Block automatic update installation to avoid further installation
  5. You are done.

Disable OGA Notification – Hack – 5

Microsoft does not allow people to uninstall OGA notifications, but you can easily delete and remove OGA components from your system manually. In this way, they will be automatically go inactive and you won’t see those boring “This copy of Microsoft Office is not genuine” notifications again.

  1. Close all Office applications first
  2. Navigate to C:\Wndows\System32 or C:\Windows\SysWow64 folder and delete the following files
  3. OGAVerify.exe
    OGAAddin.dll

  4. You are done.

You can follow any of above 5 tricks to uninstall, remove or disable Office Genuine Advantage notifications (OGA or KB646810 notifications). Remember to disable auto-update feature else KB949810 update will get installed again.

Wednesday, October 14, 2009

TrustSoldier -- VIRUS ALERT

TrustSoldier

What this programs does:

TrustSoldier is a new scareware program that is installed and promoted through the use of Trojans. When the Trojan installs TrustSoldier it will configure it to start automatically when your computer starts. The Trojan will also install numerous harmless files that have random names onto your computer. When TrustSoldier starts it will scan your computer and detect these harmless files as malware and will state that you need to purchase the program to remove them. Though these files are harmless, it detects them as malware to try and trick you into thinking they are infections so that you will potentially purchase TrustSoldier. It goes without saying that you should not purchase this program.

TrustSoldier screen shot
For more screen shots of this infection click on the image above.
There are a total of 6 images you can view.

While TrustSoldier is running you will also see numerous security notices appear on your desktop warning you that your computer has a security problem. These alerts will contain messages ranging from warnings that your computer is under attack to a message stating that an active malware has been detected running on your computer. The Trojan will also display a Windows Security Center window that is an imposter of the legitimate Microsoft version. The difference is that the imposter will state that you should register TrustSoldier in order to protect your computer, while the legitimate version does not recommend any particular security software. Just like the fake scan results, these alerts are just another tactic to scare you into thinking that you are infected.

If you find that TrustSoldier is on your computer then please use the steps below to remove this infection and any related malware. If you have already purchased this program then we suggest you contact your credit card company and dispute the charges.

Threat Classification:

Advanced information:

View TrustSoldier files.
View TrustSoldier Registry Information.

Entries for this program found in the Add or Remove Programs control panel:

TrustSoldier

Tools Needed for this fix:

Symptoms that may be in a HijackThis Log:

O4 - HKCU\..\Run: [626ac87.exe] C:\WINDOWS\system32\626ac87.exe
O4 - HKCU\..\Run: [TrustSoldier] C:\Program Files\TrustSoldier Software\TrustSoldier\TrustSoldier.exe -min

WELCOME WINDOWS 7

Windows 7 Specifications | Windows 7 Vienna Screen Shots | Latest Windows Information

Windows 7 Specifications | Windows 7 Vienna Screen Shots | Latest Windows Information


Windows 7 Specifications | Windows 7 Vienna Screen Shots | Latest Windows Information

Windows 7 Specifications | Windows 7 Vienna Screen Shots | Latest Windows Information

Windows 7 Specifications | Windows 7 Vienna Screen Shots | Latest Windows Information

Windows 7 Specifications | Windows 7 Vienna Screen Shots | Latest Windows Information

Windows 7 Specifications | Windows 7 Vienna Screen Shots | Latest Windows Information

Windows 7 Specifications | Windows 7 Vienna Screen Shots | Latest Windows Information

Windows 7 Specifications | Windows 7 Vienna Screen Shots | Latest Windows Information

Windows 7 Specifications | Windows 7 Vienna Screen Shots | Latest Windows Information

Windows 7 Specifications | Windows 7 Vienna Screen Shots | Latest Windows Information

Windows 7 Specifications | Windows 7 Vienna Screen Shots | Latest Windows Information

Windows 7 Specifications | Windows 7 Vienna Screen Shots | Latest Windows Information